3rd Year Reflection
Posted: May 18, 2017 Filed under: 3rd year, Field, SUBJECT Leave a commentDuring my 3rd and final year at university, I was able to explore two topics that are very important to me. Arthritis and diabetes, two major diseases that cause many medical, physical and emotional issues for the people who have them, and also for those who are close to them.
Focusing on a change of aesthetic for adaptive grips directed at those with hand deterioration which has formed due to arthritis, was my first major project of the year. which was also my chosen topic for my dissertation paper, where i focused on discovering research on each topic of the question, and creating a concept design, which allowed me to develop further and a final concept later on in the year once my dissertation was submitted. In reflection, i believe that i was able to successfully produce a product that has a better aesthetic and a better material concept than the current adaptive grips or cutlery on the market. By changing the aesthetics of the piece it will hopefully make the users feel more comfortable in using the product especially in social situations.
After my viva presentation i felt that i was lacking in knowledge of the manufacturing and costings side, which i think is partly due to issues with communication with the company i had chosen to work with. I was able to find out as much as I could through information they were able to provide me with during quotes. Also after rethinking and reflecting on the project i have realised that i had over complicated the design on the piece and that it could of been four section and not six which would reduce the cost of manufacturing and the product.
Taking on projects during the third year does come with a major step up and increase in work load, from second year, which is of course to be expected. Though I feel that we still could of been better prepared by doing larger projects during second year where we either had to work with a client or towards a prize like most of us have done during this third year. As always standards are very high and get higher as you go through university and it is important to know and keep all students in line with what needs to be presented and what they expect from each student whether its for a presentation or exhibition models.
The second project i chose to take on was related to diabetes, using my brother as my main client for this project was very helpful as i was able to go back and forth to him with almost every recipe and part of the packaging design. Which is very helpful for a project because even though the designer is making the final say there is someone else who is making the decisions which allows for a better design in the end.
The final product i came up with for a solution was a different type of product then is usually used in product design. The problem i was solving was; there is no suitable snack or dessert food product for diabetics. The final product i designed was three flavours of cheesecake, which are low in sugar, decreased fat, carbohydrates and with increased protein. By changing the recipe of the cheesecake it does allow for a better product then is currently on the market, there are of course many sugar free or free from alternatives that are becoming even more available there is still a major gap.
This project did involve lots of experimentation which with any recipe or product is true. I’ve had lots of speculations for tutors and course mates telling me that i am not making a real product or I’m not doing product design by making cheesecakes. But these are false statements like anything we choose to have in our house or wear on our bodies it applies the same for the food we choose to put into our bodies. Those of the population who have intolerance or are watching there weight stick to certain food groups, it goes the same for those who are diabetics.
In reflection i think i was trying to pick an easier more creative solution for my second project, but like any project there is always more research and more parts to the project then the designer originally thinks. If anything through this project i have certainly managed to make three yummy cheesecakes, which i will be able to make without a recipe and less than an hours notice.
I think even though i may not of been able to complete the final models the way that i would of liked them to turn out. I am happy with where the project have ended and the products I have developed in the year. The other thing i am happy with is that i have been able to do two project i hold very close to my heart and have been a large part of my family life.
Development of Dissertation Artefact;2nd Dec 2016
Posted: December 2, 2016 Filed under: Dissertation, SUBJECT Leave a commentAfter making rapid prototypes in blue foam, i was then able to think about ways of making the same shapes in silicone. First i asked people to tell me which of the models felt nicest to hold in their hands, i made 3 moulds using the vacuum former. Using blue foam for this i realised was not the best idea as blue foam + heat + very hot plastic + compression = problem of getting blue foam back out of the vacuum form plastic.
3 different sized grips were vacuum formed, sizes below;
1) 40mm X 15 mm ![]() X 150mm (h)
X 150mm (h)
2) 40mm X 25mm ![]() X 150mm (h)
X 150mm (h)
3) 30mm X 25mm ![]() X 150 mm (h)
X 150 mm (h)
With two different shore strengths of silicone it allows for room for experimentation before creating a final working prototype. I was successful in creating 2 prototypes (so far) out of the 15 shore strength casting silicone, which I believe is appropriate and will work for the concept that I am designing, as this silicone is squishy and allows the hand to grip this handle and conform to the hand in the way that anyone who holds this handle will need. I haven’t been successful yet in casting the higher shore strength as of yet, this may be because of the mixing ratio, or something else.
Development of Dissertation Artefact; 24th Nov 2016
Posted: November 24, 2016 Filed under: Dissertation, SUBJECT Leave a commentNow with a valid and working concept design its time to start prototyping the concepts, same shape different sizes, scaled up versions to see how the different detailed patterns might feel.
With a few rapid prototypes made they need to be tested to see which size and pattern might be correct and feel right in the hand. But when testing these models it is important to remember that the blue foam material does not share the same likeness and feel of the material I am planning on using to create the product. The material I am hoping for this product to be made out of silicone and this is a slightly less hard and structured material which will have more give to in once it is held in the hand. So to be able to understand this difference, I ordered some casting silicone material in two different shore strengths to allow me to test which might be best or if a mixture (like i am hoping to do) will work as well.
Progress on dissertation artefact; 10 November 2016
Posted: November 14, 2016 Filed under: Dissertation, SUBJECT Leave a commentAfter the let down of not being able to complete ethnographic research due to not being allowed to visit the facilities, it meant that i was slightly set back. To get around this problem i decided to visit a few stores in town and see what they are currently selling in the cutlery departments, to understand the current market a bit more.
After visiting the stores i set up a survey on survey monkey, which i then sent off to my parents (who fall in the target market age) to send on to there friends. By doing this i was able to get a correct results for my target market, the survey was based around cutlery and the features and aesthetics that the target market age group will look for, it was also aimed to understand how important choosing and using cutlery is in daily life.
the information that i recieved back from the survey was able to help me refine what people in my target market look for most in the cutlery they chose to buy.
The cutlery that was most liked in the survey was;

the second highest was;
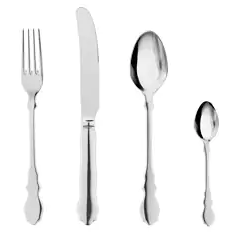
both of these sets of cutlery have a clean, simple aesthetic to them with limited design features, therefore for my product i have also decided to take this approach with my design, a simple clean design with detail that will be similar to the second set of cutlery.
2nd Year Final Major Project
Posted: April 2, 2016 Filed under: SUBJECT Leave a commentUsing the same brief as the facebook project; taking an object and adding the internet to make it function better.

i’ve chosen to redesign a prescription pill pot, so that people suffering from arthritis will be able to open it easily without having to force their hands and fingers into positions that they are unable to do any more from the slewing in there joints. Also i will be adding an internet feature, to allow the pill pot to notify the pharmacy of when a prescription will need to be refilled ( based on the weight left in the pill pot), and possible alarm system to allow the pill pot to remind the person to take there medication, either with a vibrating modification or being able to program it to call the house phone as most of the elderly population will not use a mobile phone.
EXISTING PRODUCTS
RESEARCH ON ARTHRITIS
- Arthiritis
- Rheumatoid arthritis
- Osteoarthritis (most common according to arthritis foundation)
Facts;
- Arthritis can effect any joint in the body
- Osteoarthritis typically affects people older than 40 (American college of rheumatology)
- Affects both men and women equally
- 3 joints it affects; 1st carpometacarpal joint (joint of the thumb), the distal interphalangeal joint (synovial hinge joint; tip of the finger), proximal interphalangeal joint (middle of the finger synovial hinge joint)
- Arthritis describes a condition in which this protective covering and fluid-filled sac degenerate, allowing bones to rub together.
- The symptoms of osteoarthritis are pain, stiffness and swelling at the joints of the fingers or base of the thumb. A bump may even appear at the affected site.
- A person suffering from arthritis of the hands may have trouble pinching or gripping items. Other activities, such as knitting, turning a key or typing, may be impaired.
- There is no cure for arthritis, but there are treatments to reduce the symptoms and improve mobility
- Osteoarthritis; When this happens, the bones rub directly against other bones. This causes structural changes that can be seen on X-rays. Bone deposits orbone spurs known as osteophytes may develop on the edges of the joints.
- According to the Centers for Disease Control, 27 million American adults have osteoarthritis.
SKETCHES
INITIAL SKETCHES
MODELS
DEVELOPMENT OF MODELS
DEVELOPMENT SKETCHES OF CONCEPT
MAKING OF FINAL MODEL
FINAL PRODUCT
Facebook Project
Posted: April 2, 2016 Filed under: SUBJECT Leave a commentThe brief was to take an everyday object and connecting it to the internet (facebook) as a hypothetical way of connecting the object to the internet.
for this project it was run slightly differently to how usual project are run that was based mostly on the exchange students, as 30 of our students went to either Holland or Belgium and we got some of there students to make up the groups. there was 6 people in each group 2 from Cardiff 2 from Holland and 2 from Belgium. This lead to a few extra problems then we usually have to deal with when we usually do a group project, these were usually to do with language barriers, or with the difference of how they tend to run group projects. which made communication and agreeing on an object and design very difficult.


We first started by making mind maps of household items and mundane tasks that we hate doing but have to do, like brushing our teeth or hoovering. We then each choose a room or an item that goes in that room to come up with ideas, once we came up with a few ideas we then shared and chose 2. The first was a fridge which scanned food, to either help you with what was going off or becoming empty or to help you with choosing something to eat for dinner. The second was a doorbell which would send a message to your phone when someone rung it, with a camera in it to allow you to see the person who is outside your door. We chose to go with the doorbell.


we developed different designs for the doorbell, and how the doorbell would work. to make it easier to install and cheaper, we chose to make it a wireless doorbell, that can simply be screwed into the wall and run off battery power. To make the doorbell more efficient we chose to make a hub to go into the house to allow the hub to do most of the work, the hub would allow for the doorbell to remain in a sleeping function with only the sensor to be on at all times so that when someone gets within a meter of the door the rest of the doorbell would activate, this will allow battery power to be saved and make the battery pack last longer then if all the functions were solely in the doorbell.


the knock knock app; allows the doorbell to send a photo of the person who is ringing the doorbell to your phone, it comes ups on your phone like a phone call. with three buttons, an ignore, open the door and speak. the app allows you to open the door even when your not at home whether your just down the road or hours away.
counterbalance lamp
Posted: October 20, 2015 Filed under: SUBJECT Leave a commenta counterbalance lamp is a free standing or desk lamp that stands and is held up by the weight of the lamp and the balance that is on the opposite end of the pole that has the lamp shade attached to it. this product is more of an asthetic piece then a piece of product that is used for a function. obviously it is a lamp but the counterbalance doesnt have a purpose apart from the fact that it is just an extra piece of the design that helps the lamp to function properly. Obviously there are a lot of different designs for desk or free standing lamps, so why would you choose to design a lamp that has an extra formation to it that has no real function purpose. simple to make something pretty, something that people want to have on there desk or in there living room, then a counter balance lamp would make perfect sense for that reason.
for my counter balance lamp I didnt want to design something ugly and similar to the other products that already exisited, so I thought about other counterbalance products. the first thing that came to mind was other counterbalance products, like geo- balls that help products that drive on walls and will always bounce back to the same side everytime. with that idea in mind I chose to design a lamp with a geo-ball for the bass of the lamp. This meant that you could pull it down all the way to the desk and it would spring back and forth till it would final go back to the original position and remain there. by designing it with a geo-ball as the base it would take up less space on the desk then other counterbalance lamp which tend to take up a lot of space, based on the way they are designed.
100 ideas
Posted: October 4, 2015 Filed under: SUBJECT Leave a comment100 idea project was a both hard and easy, it was hard based on the fact that a 100 ideas for a mundane item like a pepper grinder is hard, especially when thinking rationally most usefully and function pepper grinders are already in the market. which kind of forced me into thinking of more comical designs on a pepper grinder. Ie most of my designs worked with the typical grinding mechanism but the design that they were shaped in wasn’t typical. when it came to it I probably only had maybe less than 10 designs that didn’t run off the typical “grinder”.
These few designs that were probably as original as you could get someone has probably already thought of but either wouldn’t work or maybe don’t have as big of a market as they should have. I went out of the box a little and thought about what else do you grind and put over food that isn’t pepper…. the first thing that pops into my head is of course salt… but salt is also very boring so I didn’t bother doing that… I one of those people that loves a bit of spice on all my food, also throwing chilli in everything and splashing Tabasco all over the place so i decided to make a chili shaped dried chili grinder. Jamie oliver has a series of flavored slat and pepper grinders but I wanted to design something a little more fun and obvious for the people that just hate spice.
one of the other ideas I had is a grinder for children, i thought about what kids love …. ICE CREAM…. who doesn’t love ice cream, and how do you make ice cream better … with sprinkles or chocolate chips … so I designed a grinder shaped like a unicorn that would essentially throw-up sprinkle bits or whatever you chose to put in it … to make something fun for kids to add to the typical desert and make it fun again.
WILDLIGHT; development
Posted: June 7, 2015 Filed under: SUBJECT Leave a commentRESEARCH


Above are some images that we found for a mood board, in the images above there are a series of different materials and styles of how these lamps and products were made. Through basic research of both 3D printed and Laser cut lamps and products we were able to decided that we wanted to laser cut our piece, after the original research we liked the look of the animal head ideas (images above) though we chose to combine this animal head idea with a clean cut version. To do this we chose to design the head in a geometric form, like the red bear above.
DEVELOPMENT;
Initially we were unsure of who our target market was, this lead to a lot of different possible designs, the images below are some paper and material models that show experimentation of the design.
The images above allowed me to see how different colours and patterns cut out of the paper came through with different patterns and shadows on the wall . This also helped when coming up with a final design, we decided to keep it simple and let the customer make it a more personal item by painting over the top of the material. This was also made it more appealing to our target market (8+) as it allows them to put there own twist on the product without many restrictions.The documents could be edited to fit in a pattern onto the pieces or it could be assembled then painted, both would be easy to do and would make this product more to the persons liking. The rendering below is an example of what might have been done if someone was to paint over the top of the product.
As can be seen the elephant head at the top are the design that would be created when our files are printed out, and the elephant heads that are below show what a Boy and Girl might do to them to create there own personal perference on the item. It creates a very different effect and becomes a much more personal item then it was before. Also as the material that is used it Acrylic it is easy to clean off paint from the surface and start over if you have made a mistake or want to change the design that you had put on it in the first place.
FINALIZING THE IDEA
At the beginning of the project we were not only unsure of what age group we wanted to aim this product at but also what design of the head we would use. So we designed several different designs of heads, which can be seen in the image below. However we chose to focus on the elephant head as it was the most well planned out CAD drawing that we had developed and seemed to fit together quite well, though we did make models of the stag head as well.
Even though the elephant head was the best CAD drawing that we had which made it easy to make it still took about six times cutting it out on the laser cutter and trying to put it together to get the final design of the product. This is because this product is quite fiddly and requires a certain touch to put it together. The images above do not do justice to the amount of pieces that there are to put together to form the head. There is in total 89 pieces to put the whole product together, 81 of those are just to make the form of the elephant head for the main part of the lamp. We would of liked to make it easier to assemble but due to the material and the restrictions of the brief we were unable to do so. Though we did find it a lot easier to put the piece together if you tape the group of shapes as they are when you open the laser cutting machine, this way you are not wasting all your time trying to find the right piece to go where as the pieces are not numbered in anyway. That is defiantly one thing that I would do if I did this project over or something similar to this again. Also the bigger that you print it out the easier it is to put together, and vice versa. Another reason this assembly of this product is tricky is due to the angle that the pieces have to form to create the head in the correct shape, we found it hard to create something to stick the pieces together. We thought about different joints, but that would mean redesigning the whole head and every line and decided not to do this as it would cause the angles to be off when we assembled it. We though about pegs or slots but decided in the end that threading wire or thread in holes would be the best idea. As through threading wire or thread it allows you to pull the pieces together as tightly as they will go and also allows the angles that are needed to create the correct shape for the head. It takes a bit more time but it gives an effect to the piece to make it less modern and looks a bit more family orientated, and becomes a family activity putting the pieces together a bit like a jigsaw.
The image above is an exploded view of the head, this shows intercrate the pieces are and that it is a pretty complex design but is well worth the effort to put it together.
The image above is our final piece; which we threaded/ tied together with black wire but of course when making your own use whatever wire or thread you want. We also chose to make our clear acrylic frosted as when doing research into mood and night lighting we found that most of the product used frosted material so that they light became dimmer and didn’t distract people as much, which is very important with the development of mood lighting. It is meant to be used at night, but this is not recommended to be used as a night light, with the light bulb that we are using. As the light bulb we chose is a high powered bright LED, it creates a very bright light which is what we wanted for our product and the exhibition, but if its going to be used as a night light we recommend a dim yellow to red colour tone as this the colour range that indicates to our brain that it is night time.
FINAL PRODUCT
FINAL TOUCHES
We decided to add/ make a logo for the product to make our images look more official, I created the logo, but decided to keep it relatively simple to allow it to be readable and still look appealing one of things that we wanted to communicate through the logo that the product is for kids ( 8 and up). Which is why I used a bright pink, blue and yellow in the logo. Also a bit of photoshoping to create the image below with the family and the product as we were unable to take a real life image of a family using or putting together our product with the correct age group.


